➤ How to Code a Game
➤ Array Programs in Java
➤ Java Inline Thread Creation
➤ Java Custom Exception
➤ Hibernate vs JDBC
➤ Object Relational Mapping
➤ Check Oracle DB Size
➤ Check Oracle DB Version
➤ Generation of Computers
➤ XML Pros & Cons
➤ Git Analytics & Its Uses
➤ Top Skills for Cloud Professional
➤ How to Hire Best Candidates
➤ Scrum Master Roles & Work
➤ CyberSecurity in Python
➤ Protect from Cyber-Attack
➤ Solve App Development Challenges
➤ Top Chrome Extensions for Twitch Users
➤ Mistakes That Can Ruin Your Test Metric Program
Gradle Tutorial | Gradle is an open-source build tool. Gradle’s Main Features are:-
- Customizable build tool:- It allows us to write build scripts in Groovy, Kotlin, and other languages. It can be used for any JVM-based language like Java, Groovy, Kotlin, Scala, Java, Golang, etc..
- Fast:- It gives better performance compared to Maven. It uses an incremental build process which means in our project if we modify only 2 Java files, and build it then Gradle will compile only those modified Java files but not the whole project. It has a caching concept to reuse jars, plugins, etc.
- Powerful:- It has many facilities to make the build process simple like:-
- The
gradlew(Gradle wrapper) is given to use the Gradle without manually installing it. It can download Gradle dynamically. - Ability to work with multiple repositories to get jars, plugins, etc from the internet like Maven, Ivy, google, local file system repositories, etc.
- The
We will see Gradle from two different angles:-
- Gradle CLI
- STS/Eclipse Gradle.
Download and install the Gradle and set the Path:- Install Gradle Guide.
Verify the Gradle installation:- gradle -v.
gradle -vTechnical Features of Gradle
- Gradle is declarative (self-intelligent).
- It has a life cycle.
- It can work with multiple repositories like Maven, Ivy, google, etc repositories.
- Gradle has an incremental build process.
- It gives a standard directory structure to develop different types of projects.
- It provides lots of plugins having tasks to simplify the process.
- The gradle caching feature gives lots of reusability of plugins, jars, etc.
- Easy to develop multi-module projects.
- Allows to convert Gradle projects to Maven projects.
- It has integration with multiple IDEs.
- No need to write the build script in XML. We can use DSL (domain-specific language). DSL can be written in Groovy or Kotlin.
DSL Groovy Basics
Before going ahead let us see DSL (domain-specific language) basics because build.gradle file is developed using DSL.
Input file is build.gradle. It is an alternative to the pom.xml of Maven. It will have plugins. Plugins will have tasks, and tasks will have actions. To complete these actions we can call methods. Gradle gives lots of built-in plugins having tasks with dependencies.
In Groovy, { } is called Enclosure.setDir('hello') = setDir:'hello' = Dir:'hello'
Create a folder with any name. Inside that create a file build.gradle and place the below content:-
task t1 {
    doLast {
        println "Welcome to Gradle"
    }
}
Open cmd and execute gradle task --all. It will all tasks. In other tasks we can see our t1 task.
> gradle task --all

Other tasks
-----------
components - Displays the components produced by root project 'notepad'. [deprecated]
dependentComponents - Displays the dependent components of components in root project 'notepad'. [deprecated]
model - Displays the configuration model of root project 'notepad'. [deprecated]
prepareKotlinBuildScriptModel
t1
If we use gradle task then it will list only built-in tasks, but not the user-defined tasks. To execute the task use gradle t1.
> gradle t1

> Task :t1
Welcome to Gradle

BUILD SUCCESSFUL in 1s
1 actionable task: 1 executed
If we don’t want to see log messages then gradle -q t1.
> gradle -q t1
Welcome to Gradle
The same task t1 in the build.gradle can be written with different syntax as follows, they all work the same:-
task t1 {
    println "Welcome to Gradle"
}
task t1
t1 {
doLast{
println "Welcome to Gradle"
}
}task t1
t1 {
println "Welcome to Gradle"
}Let us see examples of tasks having dependencies on other tasks:-
task "t1"
task ("t2")
task t3
task t4

t1 {
    doLast{println "task1"}
}

t2 {
    doLast{println "task2"}
}
t2 {
    doLast{println "t2-2-last"}
    doFirst{println "t2-2-first"}
}

t3 {
    dependsOn t2, t1
    doLast{println "task3"}
}

t4 {
    doLast{println "task4"}
}
t4.dependsOn t3
defaultTasks 't4'
Try with gradle task --all, gradle t1, gradle t2, gradle t3, and gradle t4.
> gradle -q t3
task1
t2-2-first
task2
t2-2-last
task3
> gradle -q t4
task1
t2-2-first
task2
t2-2-last
task3
task4Gradle has many pre-defined plugins and “java” is one of them which is used to work with Java projects. Java plugins have multiple tasks:- build, jar, compilejava, assemble, clean, test, etc. They are dependent on each other. Gradle Java Plugin Tasks:-

For every Gradle project one build.gradle file will be there which is a groovy-based file. It contains the following information:-
- Plugins
- Repositories
- Dependencies
Gradle isn’t only used with Java only. By default, Gradle is mostly used for Android-based tools. Even Gradle can be used along with C++, Kotlin, Ruby, Scala, and JavaScript. The build.gradle supports every language’s internal conversion. It means the same build.gradle file supports execution for Java/Kotlin/Ruby/Scala, and e.t.c. Such files are called DSL (domain-specific language).
Gradle CLI Example
Gradle Standard directory structure for standalone apps:-
GradleApp
    -> src
        -> main
            -> java
                -> com.knowprogram
                    -> Arithmetic.java
        -> test
            -> java
    -> build.gradle
In Arithmetic.java:-
package com.knowprogram;
public class Arithmetic {

    public int sum(int a, int b) {
        return a + b;
    }

    public static void main(String[] args) {
        System.out.println("Welcome to Gradle");
        Arithmetic arithmetic = new Arithmetic();
        System.out.println("Result: "+ arithmetic.sum(10, 331));
    }
}
In build.gradle:-
apply plugin: 'java'
version = '1.0'
Open CMD from the project directory where the src folder is located and try the below commands:-
> gradle task --all
> gradle build
It will perform multiple tasks including compilation, and creating jar files. The jar file can be found in the generated build/libs folder. To run the Arithmetic from the Jar file:-
> java -jar build/libs/GradleApp-1.0.jar com.knowprogram.ArithmeticIt will delete the previously generated “build” folder.
> gradle cleanModify the source code.
System.out.println("Welcome to Gradle-1");Use the below command to re-generate the jar file along with deleting the existing:-
> gradle clean build
> java -jar build/libs/GradleApp-1.0.jar com.knowprogram.Arithmetic
In the above command, to run the Arithmetic class we are manually specifying the class name with the package. We can prevent that by adding a manifest file and making the Arithmetic class an entry point of the jar file. While working with Gradle we can directly specify this in build.gradle which adds content to the manifest file of the jar:-
apply plugin: 'java'
version = '1.0'
jar {
    manifest {
        attributes 'Main-Class': 'com.knowprogram.Arithmetic'
    }
}
> gradle clean build
> java -jar build/libs/GradleApp-1.0.jarThere is no “run” task in the “java” plugin but we have a “run” task in the “application” plugin. And since we are going to run it through Gradle therefore specifying the Main class for the manifest file is not required. In build.gradle:-
apply plugin: 'java'
apply plugin: 'application'

version = '1.0'
mainClassName = 'com.knowprogram.Arithmetic'
Now, when executed gradle task --all then it will list the Application plugin “run” task along with other tasks.
Application tasks
-----------------
run - Runs this project as a JVM application
Now we can run the jar directly as:- gradle run or gradle jar run. However, it is a deprecated feature. Therefore we can create a custom task as follows:-
apply plugin: 'java'

version = '1.0'

task runApp(type: JavaExec) {
    main = 'com.knowprogram.Arithmetic'
    classpath = sourceSets.main.runtimeClasspath
}
And run it through:- gradle runApp or gradle jar runApp.
Gradle Eclipse Example
The latest STS/Eclipse IDE by default comes with Gradle and we need not add them explicitly. In older Eclipse you can install the Buildship Gradle plugin from Eclipse marketplace (Help > Eclipse Market Place > Search for “Buildship Gradle” > Install > Next > Finish).
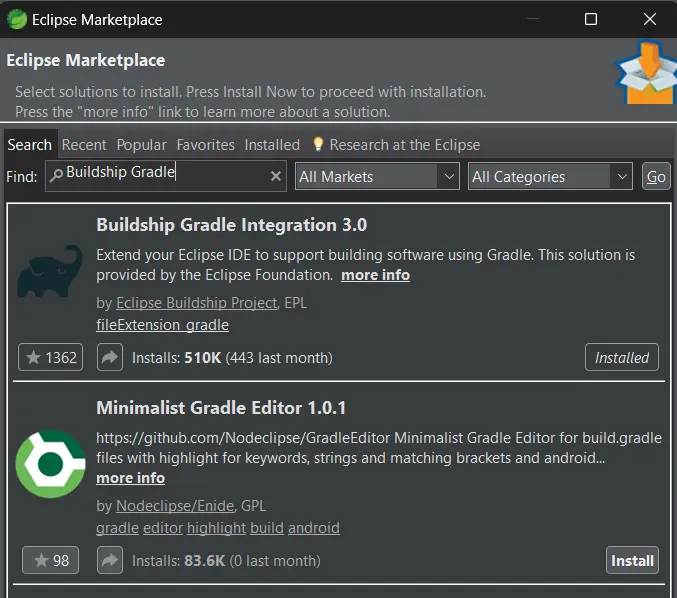
Gradle Project in STS/Eclipse
- File > New > Other > Search for “Gradle Project” > Next
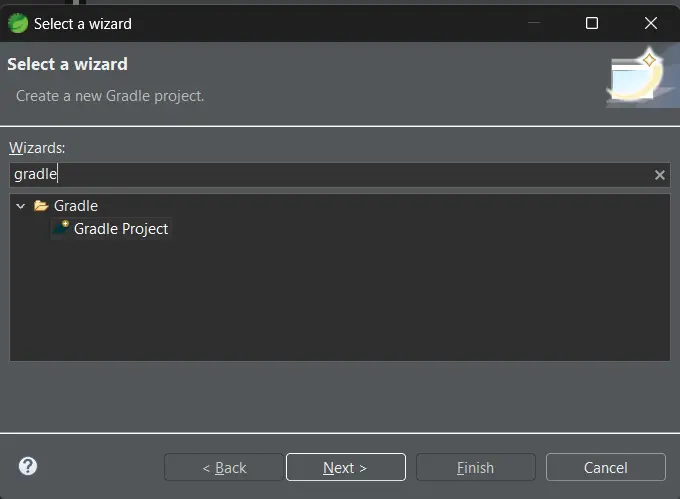
- Enter some project names like “MyFirstGradleApp”.
- Override workspace settings, enable “Show Console View” and “Show Executions View” > Next > Finish.
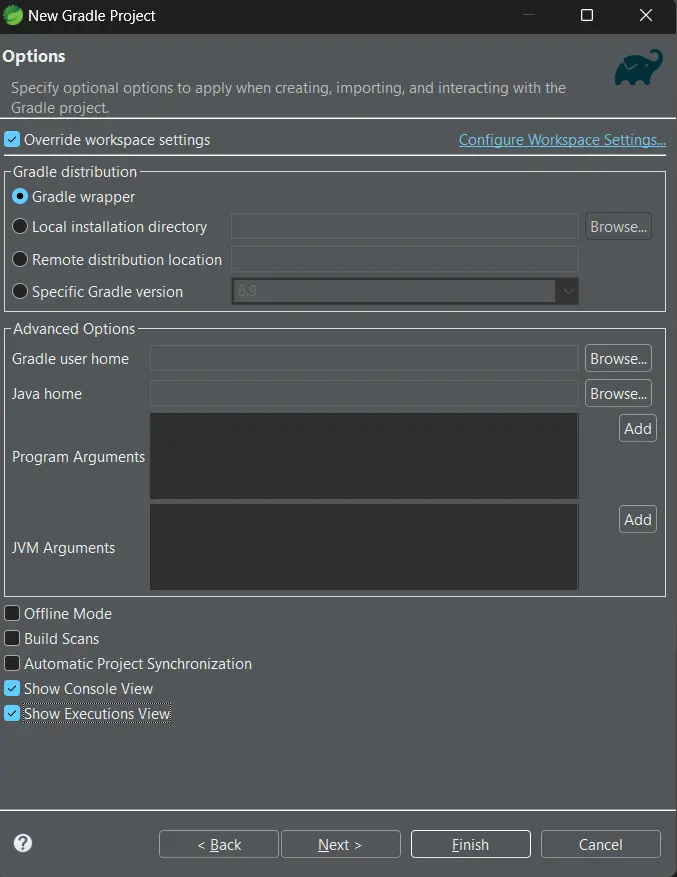
In the Gradle distribution section of the above image, the given options work as follows:-
- Gradle Wrapper:- Dynamically download the latest version of Gradle.
- Local Installation Directory:- We can specify the Gradle location installed on our computer.
- Remote distribution location:- Specify the remote distribution location.
- Specific Gradle Version:- Dynamically download the specified version of Gradle.
Following is the folder structure.

It will contain the following folders:-
- src/main/java
- src/main/resources
- src/test/java
- src/test/resources
The src/main/java and src/main/resources are used for development purposes whereas src/test/java and src/test/resources are used for test purposes. The src/main/java and src/test/java will contain Java files whereas src/main/resources and src/test/resources are used to place non-Java files like properties files, XML files, and e.t.c.
The build.gradle come up with some predefined content.
Delete the content of build.gradle file and existing files from src/main/java and src/test/java. After any modification, Right click on the project > Gradle => Refresh Gradle.
The default folder to store all dependencies in our local system is C:/Users/<user>/.gradle. Similarly, for the maven, it is C:/Users/<user>/.m2.
// plugins
plugins {
	id 'java'
}

// repositories
repositories {
    mavenCentral()
}

// version
// modify the JDK version
sourceCompatibility=1.8
targetCompatibility=1.8

// dependencies
// JARs requires to run the application
dependencies {
    implementation group: 'com.mysql', name: 'mysql-connector-j', version: '8.4.0'
    implementation group: 'org.hibernate.orm', name: 'hibernate-core', version: '6.5.2.Final'
}

// task
When we add dependencies to the build.gradle and perform refresh gradle then those dependencies are shown in the “Project and External Dependencies” folder.
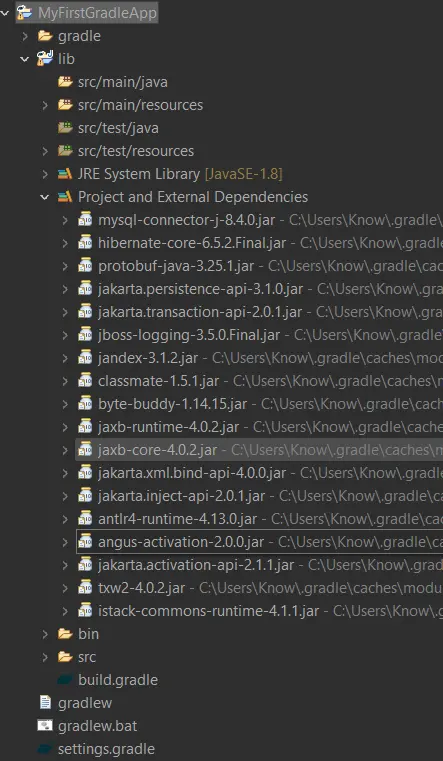
Gradle Project Example
Let us develop a simple Encode & Decode Java Project. It will require “Apache Commons Codec” dependencies.
// plugins
plugins {
	id 'java'
}

// repositories
repositories {
    mavenCentral()
}

// version
// modify the JDK version
sourceCompatibility=1.8
targetCompatibility=1.8

// dependencies
dependencies {
    implementation group: 'commons-codec', name: 'commons-codec', version: '1.15'
}
package com.knowprogram;
import org.apache.commons.codec.binary.Base64;
public class TestMain {
public static void main(String[] args) {
String input = "Hello";
byte[] arr = Base64.encodeBase64(input.getBytes());
String encodedString = new String(arr);
System.out.println("Encoded Data: " + encodedString);
byte[] decoded = Base64.decodeBase64(encodedString.getBytes());
String normal = new String(decoded);
System.out.println("Decoded Back: " + normal);
}
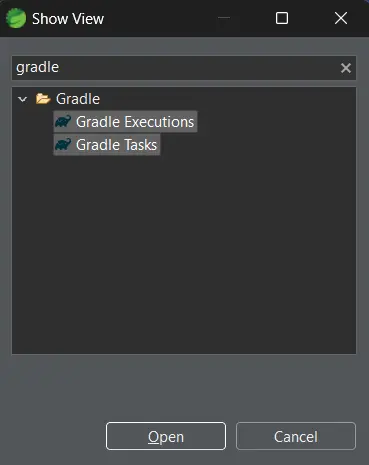
}Select the TestMain.java and Run it as a Java Application. We want to convert this project into JAR format. To do that in STS/Eclipse, go to Window > Show View > Other > Search for Gradle and choose both “Gradle Executions” and “Gradle Tasks” > Open.
It will enable show view of them as follows:-
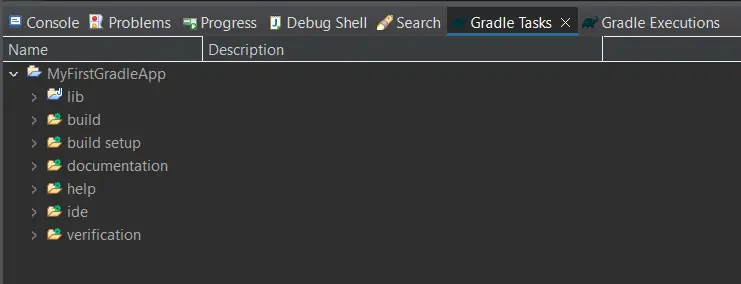
In Gradle Tasks > build > Right Click > Run Gradle Tasks.
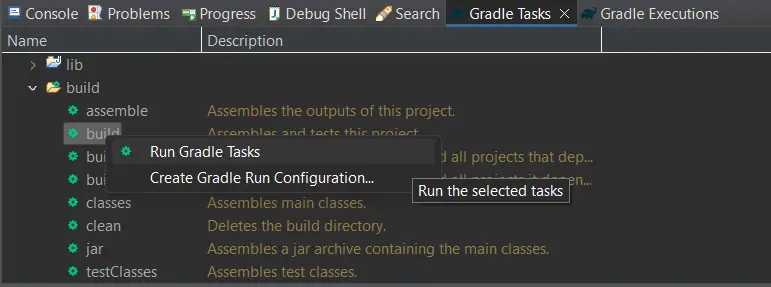
Once the Gradle Task is successfully run then we can find the jar file through File Explorer in the MyFirstGradleApp/lib/build/libs folder as a “lib.jar” file. To execute the Jar file:-java -jar lib.jar. But it will give no main manifest attribute, in lib.jar
>java -jar lib.jar
no main manifest attribute, in lib.jar
We have to specify the Main class in the Jar. We can also change the name of the jar file. Add the following to the build.gradle:-
// task
task fatJar(type: Jar) {

    // Include main classes
    from sourceSets.main.output

    // Include test classes
    from sourceSets.test.output

    manifest {
        // Whenever we execute the Jar then execute TestMain class as main class
        attributes 'Main-Class': 'com.knowprogram.TestMain'
    }

    // Set the JAR file name
    archiveBaseName = 'my-test-abc'

    // Include dependencies in the JAR
    from {
        configurations.runtimeClasspath.collect { it.isDirectory() ? it : zipTree(it) }
    }

    // Wait for runtime classpath resolution
    dependsOn configurations.runtimeClasspath
}
In Gradle Tasks > other > FatJar. If the option is not available then from the right view menu (three horizontal dots) in Gradle Tasks, enable the “Show all tasks“. Perform Gradle refresh.

After that “Refresh Tasks for all projects“, and then the “FatJar” option will come.

In Gradle Tasks > Other > Fatjar > Right Click > Run Gradle Tasks. We can delete existing jar files through Gradle Tasks > build > clean > Right Click > Run Gradle Tasks and run the “fatJar”. It will generate my-test-abc.jar. To execute the jar file:- java -jar my-test-abc.jar.
>java -jar my-test-abc.jar
Encoded Data: SGVsbG8=
Decoded Back: Hello
In Maven, whenever we modify the content in pom.xml then it auto-detects the changes and downloads/removes the dependencies and settings. But in Gradle, it won’t auto-detect the changes of build.gradle, we need to manually refresh the project. After any modification, Right click on the project > Gradle => Refresh Gradle. But we can avoid this manual refresh. For this, while creating the Gradle project we can override the workspace settings and enable the “Automatic Project Synchronization” option.

Unit Testing Using Junit & Gradle
Gradle is not only a build automation tool it is a complete project management tool. It can perform unit testing, generate documentation, etc.
Create a Gradle project “GradleAndUnitTesting“. The gradle.build file already comes with Junit dependencies.
In build.gradle:-
plugins {
    id 'java'
}

repositories {
    mavenCentral()
}

dependencies {
    testImplementation 'org.junit.jupiter:junit-jupiter:5.9.1'
}

java {
    toolchain {
        languageVersion = JavaLanguageVersion.of(17)
    }
}

tasks.named('test') {
    useJUnitPlatform()
}
Perform Gradle refresh after modifying the build.gradle file. Maven/Gradle gives dependent Jar files automatically when we add main jar file info in the build script. This is called transitive dependency.
In src/main/java, create a class MathOperations.java:-
package com.knowprogram;

public class MathOperations {

    public int sum(int x, int y) {
        return x + y;
    }

    public static void main(String[] args) {
        MathOperations operations = new MathOperations();
        System.out.println("Result: " + operations.sum(100, 5));
    }
}
Each @Test annotation method gives one Test case where expected results will be compared with actual results. In src/test/main, create a class:-
package com.knowprogram;

import static org.junit.jupiter.api.Assertions.assertEquals;

import org.junit.jupiter.api.Test;

public class MathOperationsTest {

    @Test
    public void testPositives() {
        int expected = 300;
        int actual = new MathOperations().sum(100, 200);
        assertEquals(expected, actual, "Test Positive");
    }

    @Test
    public void testNegatives() {
        int expected = -300;
        int actual = new MathOperations().sum(-100, -200);
        assertEquals(expected, actual, "Test Negatives");
    }

    @Test
    public void testMixed() {
        int expected = -100;
        int actual = new MathOperations().sum(100, -200);
        assertEquals(expected, actual, "Test Mixed");
    }

    @Test
    public void testZeros() {
        int expected = 0;
        int actual = new MathOperations().sum(0, 0);
        assertEquals(expected, actual, "Test Zeros");
    }
}
In Gradle Tasks => GradleAndUnitTesting > verification > test > Right-click & Run Gradle Tasks.
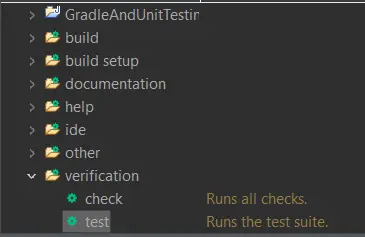
Now open the project directory in File Explorer and go to the <project-directory>\GradleAndUnitTesting\lib\build\reports\tests\test.

Open index.html file.
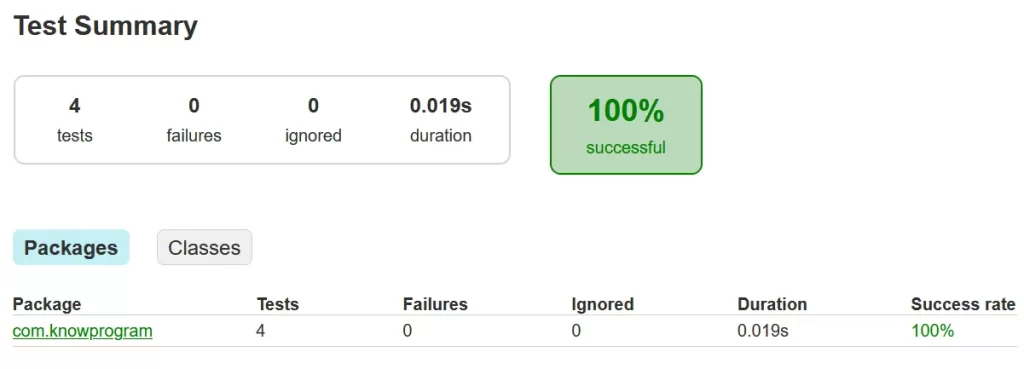
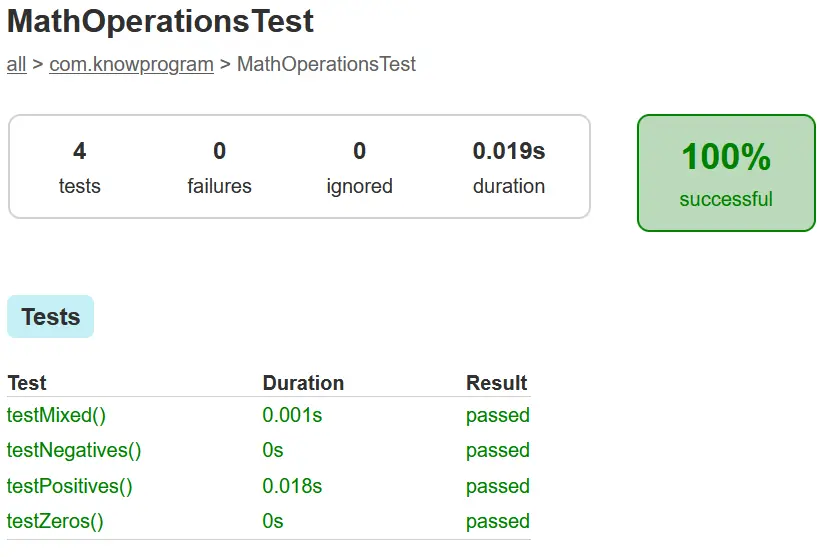
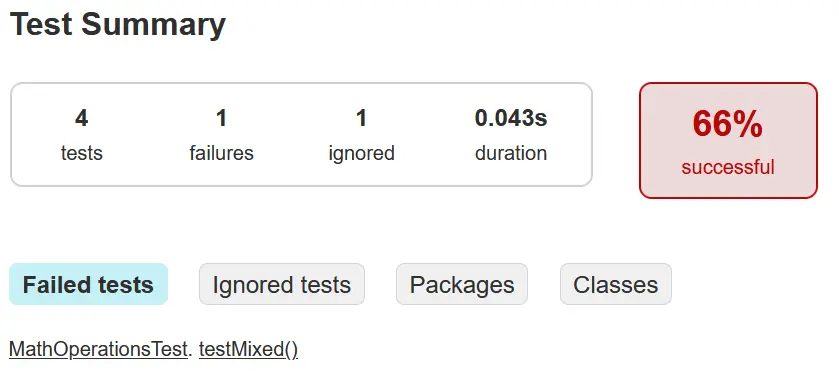
Add @Disabled one of these test methods, and in testMixed() method change this line:-int expected = -500;
Now, run the Gradle test.
Working with Multiple Repositories
We can specify multiple repositories in the repositories{} of build.gradle. By default, Gradle uses Maven Central as one of its repositories. You can include it like this:-
repositories {
    mavenCentral()
}
If you need to include other repositories (such as jCenter or custom repositories), you can add them alongside Maven Central:-
repositories {
    mavenCentral()
    jcenter() // Example: Include jCenter repository
    maven { url 'https://my.custom.repo.com/maven' } // Example: Custom repository URL
}
It will first search for all dependencies in the maven-central later if not found then will search in the other repositories.
If you have locally built JAR files that you want to include, you can use the local repository (.m2 folder):-
repositories {
    mavenLocal()
}
If your repository requires authentication (e.g., username and password), you can configure credentials:-
repositories {
    maven {
        url 'https://my.private.repo.com/maven'
        credentials {
            username 'myUsername'
            password 'myPassword'
        }
    }
}
Generating JavaDoc with Gradle
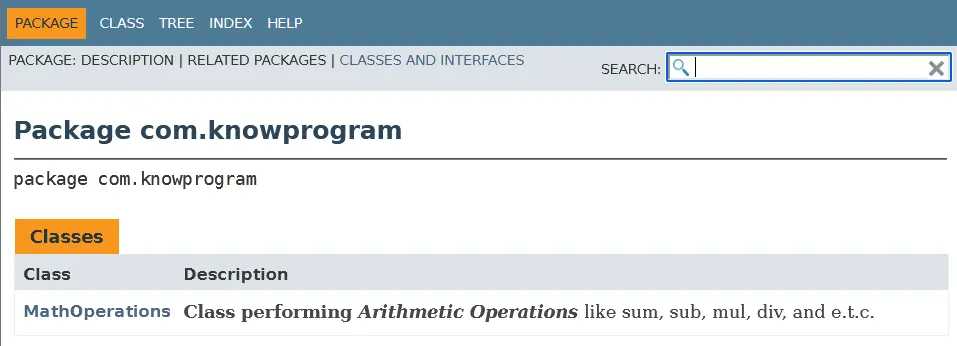
Modify class file:-
package com.knowprogram;

/**
 * <b> Class performing <i>Arithmetic Operations</i> </b> like
 * sum, sub, mul, div, and e.t.c.
 *
 * @author KnowProgram
 * @See java.lang.Math
 * @since proj1.0
 */
public class MathOperations {

    /**
     * Method Performing <b> addition </b>
     *
     * @param x takes value1
     * @param y takes value2
     * @return gives addition result
     */
    public int sum(int x, int y) {
        return x + y;
    }

    public static void main(String[] args) {
        MathOperations operations = new MathOperations();
        System.out.println("Result: " + operations.sum(100, 5));
    }
}
In Gradle Tasks => documentation => javadoc => Right-click & Run Gradle Tasks. Now go to<project-directory\GradleAndUnitTesting\lib\build\docs\javadoc and open index.html file.
Converting Gradle project to Eclipse/STS Project
Assume we have developed a Gradle project without STS/Eclipse IDE and now we want to use STS/Eclipse IDE to manage this project. Eclipse/STS projects will have special files/folders like “.settings”, “.classpath”, and “.project”. For this purpose, Gradle has an “eclipse” task and an “eclipse” plugin. Previously we have developed “GradleApp” using CLI without Eclipse/STS. Let us convert it to the Eclipse/STS project. In build.gradle add the following task:-
apply plugin: 'eclipse'Now, open CMD and run gradle task --all. It will list all tasks including IDE tasks, we can find “eclipse” and “cleanEclipse” tasks. The “eclipse” task can be used to convert a normal Gradle project to an Eclipse project, and “cleanEclipse” can be used for its reverse.
> gradle task --all
IDE tasks
---------
cleanEclipse - Cleans all Eclipse files.
eclipse - Generates all Eclipse files.
Execute the gradle eclipse command. It will generate “.settings”, “.classpath”, and “.project” files and folders.
> gradle eclipseNow we can import it into Eclipse as a Gradle project.
Convert Maven Project to Gradle Project
In Project Explorer go to the folder where the project is located, open CMD, and run:- gradle init --type=pom command.
> gradle init --type=pom

Select build script DSL:
  1: Kotlin
  2: Groovy
Enter selection (default: Kotlin) [1..2] 2

Generate build using new APIs and behavior (some features may change in the next minor release)? (default: no) [yes, no]
 yes


> Task :init
Maven to Gradle conversion is an incubating feature.
For more information, please refer to https://docs.gradle.org/8.9/userguide/migrating_from_maven.html in the Gradle documentation.

BUILD SUCCESSFUL in 33s
1 actionable task: 1 executed
If you enjoyed this post, share it with your friends. Do you want to share more information about the topic discussed above or do you find anything incorrect? Let us know in the comments. Thank you!