➤ How to Code a Game
➤ Array Programs in Java
➤ Java Inline Thread Creation
➤ Java Custom Exception
➤ Hibernate vs JDBC
➤ Object Relational Mapping
➤ Check Oracle DB Size
➤ Check Oracle DB Version
➤ Generation of Computers
➤ XML Pros & Cons
➤ Git Analytics & Its Uses
➤ Top Skills for Cloud Professional
➤ How to Hire Best Candidates
➤ Scrum Master Roles & Work
➤ CyberSecurity in Python
➤ Protect from Cyber-Attack
➤ Solve App Development Challenges
➤ Top Chrome Extensions for Twitch Users
➤ Mistakes That Can Ruin Your Test Metric Program
JUnit Annotations with Examples | We had introduced unit testing in Java, now we will see JUnit and later introduce Mockito. Also see:-
- Unit Testing in Java
- JUnit Assert Methods Example
- Mockito With Examples
- Spring Boot Unit Testing (JUnit with Mockito)
Unit testing: Here unit indicates a part of a project which can be a task/story. Once the code is completed by the developer, then that part must be tested.
Unit testing = testing one part of the project developed by a programmer. Example:- Develop the Employee register task, and test the employee register task.
JUnit
JUnit is a unit test framework. It is an open-source Java library. To test our code (class), we need to define one class which is called as Test case (test class). We need to add the following dependencies:-
<dependency>
    <groupId>org.junit.jupiter</groupId>
    <artifactId>junit-jupiter-engine</artifactId>
    <version>5.10.2</version>
    <scope>test</scope>
</dependency>
To define one test case we should use:-
- JUnit 5 Annotations.
- JUnit 5 Assert API.
JUnit 5 Annotations:-
- @Test
- @DisplayName
- @BeforeEach
- @AfterEach
- @BeforeAll
- @AfterAll
- @Disabled
- @TestMethodOrder
- @RepeatedTest
- @Tag
- @ParameterizedTest
- @ValueSource
- @NullSource
- @EmptySource
- @NullAndEmptySource
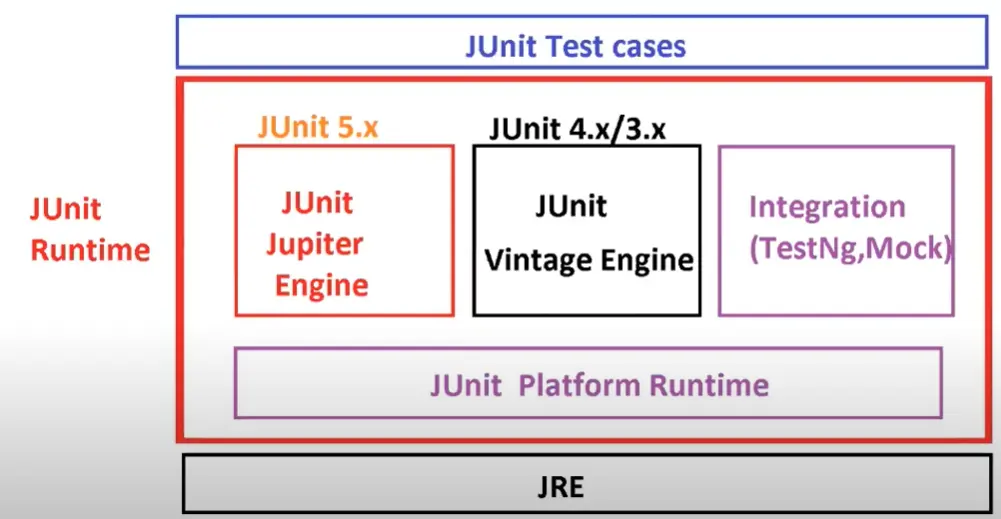
JUnit Runtime

JUnit Runtime is provided with 3 components and one platform runtime:-
- JUnit Jupiter Engine (JUnit 5 API)
- JUnit Vintage Engine (JUnit 4 and 3 APIs)
- Integration (TestNg, Mock..etc)
For our test cases (Class + Method) object creation and test-method calling done by JUnit Platform runtime.
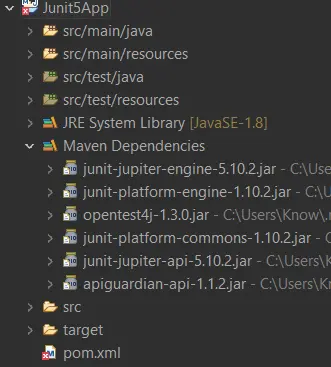
Create a Maven project, add the junit-jupiter-engine dependencies. Test cases are written inside src/test/java folder.
<dependency>
    <groupId>org.junit.jupiter</groupId>
    <artifactId>junit-jupiter-engine</artifactId>
    <version>5.10.2</version>
    <scope>test</scope>
</dependency>
While creating the test class, generally we use the “Test” prefix along with the class name and method name.
- Admin Module: TestAdmin
- Product Module: TestProduct
- save() => testSave()
- delete() => testDelete()
Create a TestEmployee class in the src/test/java folder.
package com.knowprogram.test;

import org.junit.jupiter.api.Test;

// Test case: A class that will test our code
public class TestEmployee {

    // test methods
    @Test
    public void testSave() {
        System.out.println("Hello-SAVE");
    }

    @Test
    public void testUpdate() {
        System.out.println("Hello-UPDATE");
    }

    @Test
    public void testDelete() {
        System.out.println("Hello-DELETE");
    }
}
Select the class and run as “Junit Test”. Output:-
Hello-SAVE
Hello-DELETE
Hello-UPDATE
@Test is used to make the method of test case class as a test method.
@TestMethodOrder: We can define multiple test methods inside Testcase. Those are executed in Random order by default. We can specify our own order using @TestMethodOrder and @Order. Here we need to provide @Order (number).
package com.knowprogram.test;

import org.junit.jupiter.api.MethodOrderer.OrderAnnotation;
import org.junit.jupiter.api.Order;
import org.junit.jupiter.api.Test;
import org.junit.jupiter.api.TestMethodOrder;

@TestMethodOrder(OrderAnnotation.class)
public class TestEmployee {

    // test methods
    @Test
    @Order(5)
    public void testSave() {
        System.out.println("Hello-SAVE");
    }

    @Test
    @Order(1)
    public void testUpdate() {
        System.out.println("Hello-UPDATE");
    }

    @Test
    @Order(25)
    public void testDelete() {
        System.out.println("Hello-DELETE");
    }
}
Output:-
Hello-UPDATE
Hello-SAVE
Hello-DELETE
We can also pass a negative number to the @Order like @Order(-5) and in that case method execution order of @Order has:- Negative => Zero => Positive numbers.
If we want to execute in the order of the method name then we can use:-
@TestMethodOrder(MethodName.class)The OrderAnnotation and MethodName are implementation classes of the MethodOrderer interface. Other implementation classes are:-
- DisplayName (use
@TestMethodOrder(OrderAnnotation.DisplayName.class)because@DisplayNameannotation is also there). - Random (it is default)
- Alphanumeric (it is deprecated).
JUnit5 more annotations:-
- @BeforeEach: To execute any logic once per test method before starting the test method. We usually place common logic that should be executed before each test method execution.
- @AfterEach: To execute any logic once per test method before finishing the test method. We usually place common logic that should execute after each test method execution.
- @BeforeAll: To execute any logic once per test case/class before starting. It is used to write common logic for one time for all test methods.
- @AfterAll: To execute any logic once per test case/class before finishing. It is used to place cleanup logic for all test methods.
Methods with annonations @BeforeAll, @AfterAll must be static method else Junit gives error.
package com.knowprogram.test;

import org.junit.jupiter.api.AfterAll;
import org.junit.jupiter.api.AfterEach;
import org.junit.jupiter.api.BeforeAll;
import org.junit.jupiter.api.BeforeEach;
import org.junit.jupiter.api.Test;

public class TestEmployee {

    @BeforeAll
    public static void setupOnce() {
        System.out.println("From Onetime setup");
    }

    @BeforeEach
    public void setup() {
        // setup, init data
        System.out.println("From Setup");
    }

    @Test
    public void testSave() {
        System.out.println("Hello-SAVE");
    }

    @Test
    public void testUpdate() {
        System.out.println("Hello-UPDATE");
    }

    @AfterEach
    public void clear() {
        System.out.println("Clear data");
    }

    @AfterAll
    public static void closeAll() {
        System.out.println("Once at end");
    }
}
Output:-
From Onetime setup
From Setup
Hello-SAVE
Clear data
From Setup
Hello-UPDATE
Clear data
Once at end
@DisplayName: This annotation is used to provide “Readable text” in place of actual method and class names at the JUnit console.
package com.knowprogram.test;

import org.junit.jupiter.api.DisplayName;
import org.junit.jupiter.api.Test;

@DisplayName("Testing Employee Class")
public class TestEmployee {

    @Test
    @DisplayName("Testing save method")
    public void testSave() {
        System.out.println("Hello-SAVE");
    }

    @Test
    @DisplayName("Testing update method")
    public void testUpdate() {
        System.out.println("Hello-UPDATE");
    }
}
@Disabled: This annotation is used to specify ignore one test method while executing test-case (do not execute test method).
public class TestEmployee {

    @Test
    public void testSave() {
        System.out.println("Hello-SAVE");
    }

    @Test
    @Disabled
    public void testUpdate() {
        System.out.println("Hello-UPDATE");
    }
}@RepeatedTest:- To execute any test method multiple times (like batch processing). Example:- Export 1-10 records, Export 11-20 records, export 21-30 records. It is very useful in batch processing or updatation-related tests.
TestInfo: To know our test case details like classname, method name, display name, tag name, and e.t.c we can use one interface TestInfo.
package com.knowprogram.test;

import org.junit.jupiter.api.DisplayName;
import org.junit.jupiter.api.RepeatedTest;
import org.junit.jupiter.api.Test;
import org.junit.jupiter.api.TestInfo;

public class TestEmployee {

    @Test
    @RepeatedTest(value = 3, name = "{displayName} - {currentRepetition}/{totalRepetitions}")
    @DisplayName("Multiple Test")
    public void testMultiple(TestInfo info) {
        System.out.println(info.getTestClass().get().getName());
        System.out.println(info.getTestMethod().get().getName());
        System.out.println(info.getDisplayName());
        System.out.println("=======================================");
    }
}
Output:-
com.knowprogram.test.TestEmployee
testMultiple
Multiple Test
=======================================
com.knowprogram.test.TestEmployee
testMultiple
Multiple Test - 1/3
=======================================
com.knowprogram.test.TestEmployee
testMultiple
Multiple Test - 2/3
=======================================
com.knowprogram.test.TestEmployee
testMultiple
Multiple Test - 3/3
=======================================@Tag:- It is used to filter test methods for execution in different environments. For example:- We want to test the export example in the production environment and at the same, we want to test the delete operation only in the development environment and then use the @Tag concept and maven-surefire-plugin.
public class TestEmployee {

    @Test
    @Tag("dev")
    public void testA() {
        System.out.println("Test-A");
    }

    @Test
    @Tag("prod")
    public void testB() {
        System.out.println("Test-B");
    }
}
We can specify the include and exclude tags in the pom.xml file through maven-surface-plugin.
<project>
    <build>
        <plugins>
            <plugin>
                <groupId>org.apache.maven.plugins</groupId>
                <artifactId>maven-surefire-plugin</artifactId>
                <version>3.0.0-M5</version>
                <configuration>
                    <!-- include tags -->
                    <groups>dev</groups>
                    <!-- exclude tags -->
                    <excludedGroups>prod</excludedGroups>
                </configuration>
            </plugin>
        </plugins>
    </build>
</project>
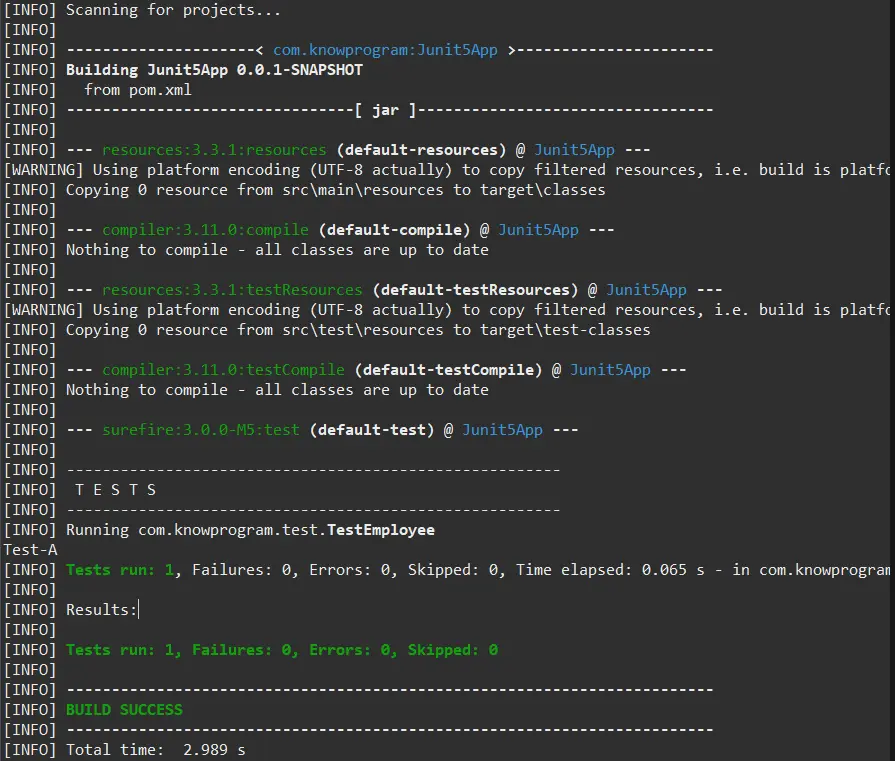
Right-click on the project, and run the application as Maven Test (not as Junit Test).

@Tag takes a single String value, so we can not pass multiple values:-@Tag("dev") // valid@Tag("dev", "prod") // invalid
But @Tag is a repetitive annotation and we can add multiple @Tag to one test method. For example, if we want to test a method in both the dev and prod environments then we can write:-
@Test
@Tag("dev")
@Tag("prod")
public void testB() {
    System.out.println("Test-B");
}
@ParameterizedTest & @ValueSource:- To execute one test method multiple times with different inputs/params we can use @ParameterizedTest and we can supply inputs by using @ValueSource and other annotations.
public class ServiceDemo {
    public boolean isOdd(int n) {
        return n % 2 == 0;
    }

    public String sayHello(String user) {
        return "Hello " + user;
    }
}
public class TestSerivceDemo {
@ParameterizedTest
@ValueSource(ints = { 10, 21, 34, 56, 11, 76 })
public void testIsOdd(int n) {
ServiceDemo demo = new ServiceDemo();
assertTrue(demo.isOdd(n));
}
@ParameterizedTest
@ValueSource(strings = { "Rocco", "William", "Kevin" })
public void testSayHello(String user) {
ServiceDemo demo = new ServiceDemo();
assertEquals("Hello " + user, demo.sayHello(user));
}
}Other annotations to pass the input values:-
- @EmptySource
- @NullSource
- @NullAndEmptySource
public class ServiceDemo {
    public boolean isEmpty(String name) {
        return name.isBlank();
    }
}
public class TestSerivceDemo {
@ParameterizedTest
// @ValueSource(strings = { "", " ", "K" })
// @EmptySource
// @NullSource
@NullAndEmptySource
public void testIsEmpty(String user) {
ServiceDemo demo = new ServiceDemo();
assertTrue(demo.isEmpty(user));
}
}If you enjoyed this post, share it with your friends. Do you want to share more information about the topic discussed above or do you find anything incorrect? Let us know in the comments. Thank you!