In the Tomcat with Eclipse tutorial, we discussed how to add or configure the tomcat server with Eclipse IDE. We will use that tomcat server in this application. Now let us develop a simple Java web application using Servlet technology with the help of Eclipse IDE.
Web application description:- Develop a simple Java Servlet web application to check the user is eligible for marriage or not. Assume the minimum age of marriage for boys = 21, and for girls = 18. Use the HTML form component to take the name, gender, and age of the user and display the message whether he/she is eligible for the marriage or not.
Create a Dynamic Web Project in Eclipse IDE
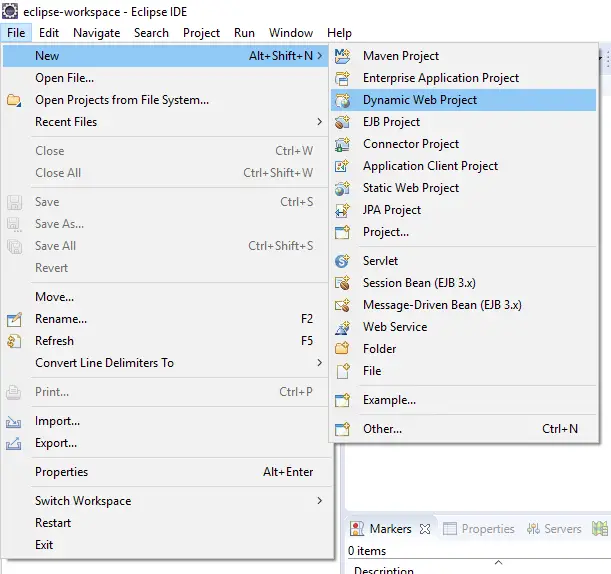
Create dynamic web project in eclipse IDE having name Marriage App and choosing tomcat server. Go to File => New => Dynamic web project

Project Name: Marriage App => Choose tomcat server as runtime environment => Next => Next

The project name will become the name of the web application. Choose target runtime as “Tomcat server”. Since we are choosing tomcat as the runtime environment, therefore, no need to add servlet-api.jar to the classpath of the web application. Dynamic web module version tells directory structure should come according to which version.

In the web module select the checkbox to “Generate web.xml deployment descriptor”, and click on the finish button.
Eclipse Dynamic Web Project Deployment Directory Structure
The generated directory structure is not the standard Java web application directory structure required by the webserver, it is the Eclipse IDE project directory structure. While the deployment of the web application (i.e. when we run the web application) then Eclipse internally converts this directory structure as required by the server. Some of these files and folders will be used in web services, not in simple web applications.

Deployment Descriptor:MarriageApp is the shortcut to access web.xml file. The code placed in src/main/java will go to WEB-INF/classes folder of standard Java web application directory structure.
Sample Web Application in Java using Eclipse IDE
Place the input.html (form page) in the webapps folder. Select webapps folder and right click => New => HTML File => Enter name input.html.
See this web application code at GitHub.
// input.html
<!DOCTYPE html>
<html>
<head>
<meta charset="ISO-8859-1">
<title>Marriage Application</title>
<style>
body {
   background-image: url('wedding.jpg');
   background-attachment: fixed;
   background-size: cover;
}
</style>
</head>
<body>
   <h1 style='text-align: center;'>MarriageApp.com</h1>
   <div>
      <form action="weeding" method="post">
         <table align="center" bgcolor="#E4E4E4">
            <tr>
               <td>Name::</td>
               <td><input type="text" name="pname"></td>
            </tr>
            <tr>
               <td>Age::</td>
               <td><input type="password" name="page"></td>
            </tr>
            <tr>
               <td>Gender::</td>
               <td>
                   <input type="radio" name="gender" value="M">Male
                   <input type="radio" name="gender" value="F">Female
               </td>
            </tr>
            <tr>
              <td><input type="submit" value="Check Marriage Eligibility"></td>
              <td><input type="reset" value="Cancel"></td>
            </tr>
         </table>
      </form>
   </div>
</body>
</html>
Develop the Servlet component in src/main/java folder,
//  MarriageServlet.java
package com.kp.servlet;

import java.io.IOException;
import java.io.PrintWriter;

import jakarta.servlet.ServletException;
import jakarta.servlet.http.HttpServlet;
import jakarta.servlet.http.HttpServletRequest;
import jakarta.servlet.http.HttpServletResponse;

public class MarriageServlet extends HttpServlet {

   @Override
   public void doPost(HttpServletRequest req, HttpServletResponse resp)
       throws ServletException, IOException {

     // declare variables
     PrintWriter pw = null;
     String name = null;
     String gender = null;
     int age = 0;

     // set content type
     resp.setContentType("text/html");

     // get PrintWriter
     pw = resp.getWriter();

     // get form data
     name = req.getParameter("pname");
     gender = req.getParameter("gender");
     age = Integer.parseInt(req.getParameter("page"));

     // check age is valid or not
     if (age <= 0 || age >= 100) {
       pw.println("<h1>Please Enter Valid Age.</h1>");
       // stop execution
       return;
     }

     // business logic
     if (gender.equals("M")) {
       if (age >= 21)
         pw.println("<h1 style='color:green; text-align:center'>" +
                      "Congratulation, Mr. " + name +
                      "<br>"   +
                      "You are eligible for marriage." +
                    "</h1>");
       else
         pw.println("<h1 style='color:red; text-align:center'>" +
                      "Sorry, Mr. " + name +
                      "<br>" +
                      "You are not eligible for marriage." +
                      "<br>Enjoy your Life." +
                     "</h1>");
     } else {
       if (age >= 18)
         pw.println("<h1 style='color:green; text-align:center'>" +
                      "Congratulation, Mrs. " + name +
                      "<br>"   +
                      "You are eligible for marriage." +
                    "</h1>");
       else
         pw.println("<h1 style='color:red; text-align:center'>" +
                      "Sorry, Miss. " + name +
                      "<br>" +
                      "You are not eligible for marriage." +
                      "<br>Enjoy your Life." +
                    "</h1>");
     }

     // link to return home
     pw.println("<h3><a href='input.html'>Home</a></h3>");

     // close stream
     pw.close();
   }

   @Override
   public void doGet(HttpServletRequest req, HttpServletResponse resp)
       throws ServletException, IOException {
     doPost(req, resp);
   }

}
Develop the deployment descriptor file (web.xml file),
<?xml version="1.0" encoding="UTF-8"?>
<web-app xmlns:xsi="http://www.w3.org/2001/XMLSchema-instance"
   xmlns="http://xmlns.jcp.org/xml/ns/javaee"
   xsi:schemaLocation=
   "http://xmlns.jcp.org/xml/ns/javaee http://xmlns.jcp.org/xml/ns/javaee/web-app_4_0.xsd"
   id="WebApp_ID" version="4.0">
   <display-name>MarriageApp</display-name>

   <welcome-file-list>
      <welcome-file>input.html</welcome-file>
   </welcome-file-list>

   <servlet>
      <servlet-name>marriage</servlet-name>
      <servlet-class>com.kp.servlet.MarriageServlet</servlet-class>
   </servlet>

   <servlet-mapping>
   <servlet-name>marriage</servlet-name>
   <url-pattern>/weeding</url-pattern>
   </servlet-mapping>
</web-app>
The Eclipse web Project structure after developing the web components,

Run Java Web Application in Eclipse
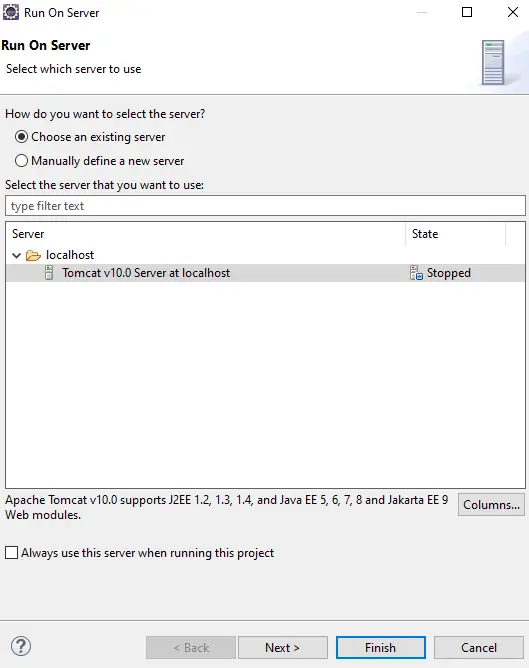
Right click to the project – > Run on server – > Select the server => Finish.

Now, the tomcat server will start (if it is not already running) and deployment-related activities will be performed. By default, the web application will be open in Eclipse itself. You can change the setting from Window => Web browser.
In Eclipse IDE no need to compile the Java class, after every modification done in the servlet component Eclipse IDE will compile it. And no need to reload the web application after modifying the servlet component, this work is also done by the Eclipse IDE.
When we run the dynamic web project, then the eclipse generates the deployment directory structure dynamically in the tomcat integrated with Eclipse.
When the Tomcat server is configured with Eclipse IDE, The Eclipse IDE will not use the original Tomcat server, it will copy the Tomcat server in its workspace folder and that will be used for deployment activities. You can get the deployed web applications at Eclipse_Workspace_location>\.metadata\.plugins\org.eclipse.wst.server.core\tmp0\wtpwebapps. There we can see Eclipse has generated the standard Java web application directory structure.
If you enjoyed this post, share it with your friends. Do you want to share more information about the topic discussed above or do you find anything incorrect? Let us know in the comments. Thank you!
Thank You, for sharing your info. I truⅼy ɑppreciate your efforts, and I wilⅼ be waiting fօr your next post. Tһank yoᥙ once again.