➤ How to Code a Game
➤ Array Programs in Java
➤ Java Inline Thread Creation
➤ Java Custom Exception
➤ Hibernate vs JDBC
➤ Object Relational Mapping
➤ Check Oracle DB Size
➤ Check Oracle DB Version
➤ Generation of Computers
➤ XML Pros & Cons
➤ Git Analytics & Its Uses
➤ Top Skills for Cloud Professional
➤ How to Hire Best Candidates
➤ Scrum Master Roles & Work
➤ CyberSecurity in Python
➤ Protect from Cyber-Attack
➤ Solve App Development Challenges
➤ Top Chrome Extensions for Twitch Users
➤ Mistakes That Can Ruin Your Test Metric Program
Spring Boot Actuator with Admin Server | Actuator: Production Ready Endpoints (Readymade services).
If one application is developed and placed in production then we need a few additional services. Example (additional services):-
- Is the Application started?
- What are objects created?
- What are properties loaded?
- What is the information on the Application?
- Schedulers details?
- Caches Enabled?
- Logger Details?
- Threads, Heap details.
These additional services can be added to our project without writing explicit code. For this, we can use an Actuator. It is a pre-defined code, we can enable/disable these services.
- Generally, for every REST/microservices Application, we should enable Actuator.
- We can check them in the dev/test environment also, but it is mainly designed for the production environment.
While creating the project we should add one dependency: spring-boot-starter-actuator
<dependency>
    <groupId>org.springframework.boot</groupId>
    <artifactId>spring-boot-starter-actuator</artifactId>
</dependency>
When we add the above dependency then 2 services(Endpoints) are activated by default with the base path /actuator. URL: http://localhost:8080/actuator. Here default endpoints are health and info.
To demonstrate let us create a spring starter project using the following dependencies:- Spring Web, Spring Boot DevTools, and Spring Boot Actuator. Start the application.
Actuator Health
The health endpoints show the status of the application:- UP/DOWN. Enter URL: http://localhost:8080/actuator/health
To see disk space(RAM details, total, free, allocated data):-
management.endpoint.health.show-details=alwaysDefault is never (don’t show), we can show the same details only after login:-
management.endpoint.health.show-details=when-authorizedTo disable health:-
management.endpoint.health.enabled=falseActuator info
The info endpoint shows the meta-data of the application Like Project Name, version, client, location, copyrights info, etc. Syntax to add info is:-
info.key=valueFor example, in application.properties:-
info.app.title=ABCD-APP
info.app.version=3.2 GA
info.client.name=KnowProgram
info.client.license=KnowProgram-NEW
URL: http://localhost:8080/actuator/info
Actuator Endpoints
Q) How can we modify the default base path?
Add below key:-
management.endpoints.web.base-path=/mytestWe can use even / also a base path, but you may not see all endpoints but we can access still with the full path as:- http://localhost:8080/info [It is not recommended]
Q) How can we activate all endpoints? (or) Specific endpoints?
To activate all endpoints:-
management.endpoints.web.exposure.include=*To activate Specific:-
management.endpoints.web.exposure.include=health,beans,envQ) How can we exclude specific endpoints?
# to activate all
management.endpoints.web.exposure.include=*

# to exclude provided
management.endpoints.web.exposure.exclude=health,info,beans,envbeans: To check what are objects created in the application we can use this endpoint. Enable this endpoint:-
management.endpoints.web.exposure.include=*
// (or)
management.endpoints.web.exposure.include=beans
URL: http://localhost:8080/actuator/beans
env: Environment – Properties (key=val) that are loaded into the Application. URL:http://localhost:8080/actuator/envconfigprops: To find keys loaded into the app using@ConfigurationProperties. URL:http://localhost:8080/actuator/configpropsscheduledtasks: To find your scheduled tasks. URL:http://localhost:8080/actuator/scheduledtasksmappings: For a given Request URL which class and method are executed, what is the output, etc. URL:http://localhost:8080/actuator/mappings
Admin Server
If we have multiple microservices then we have to check every microservices manually for Actuators. We can avoid that by using the Admin Server.
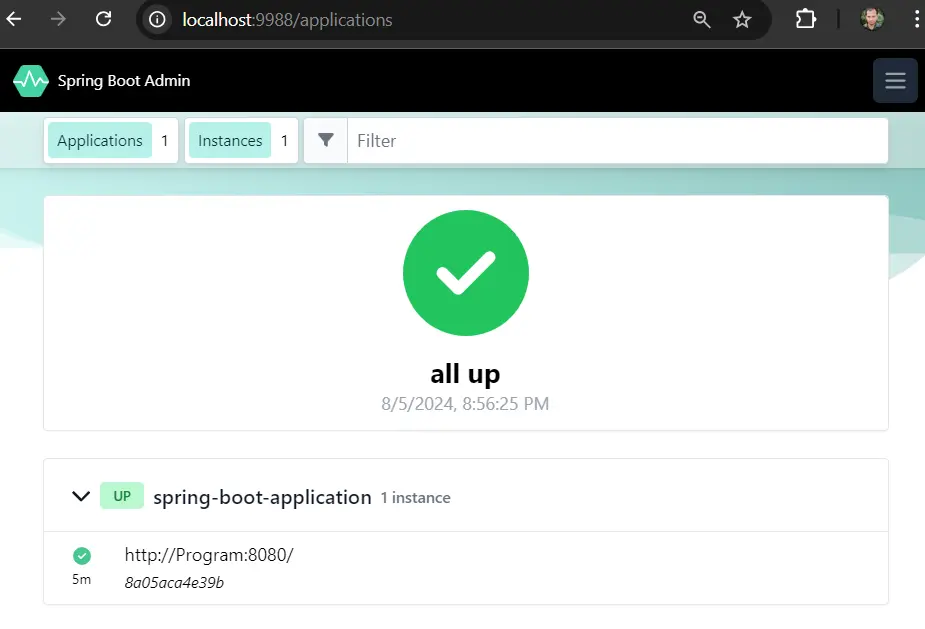
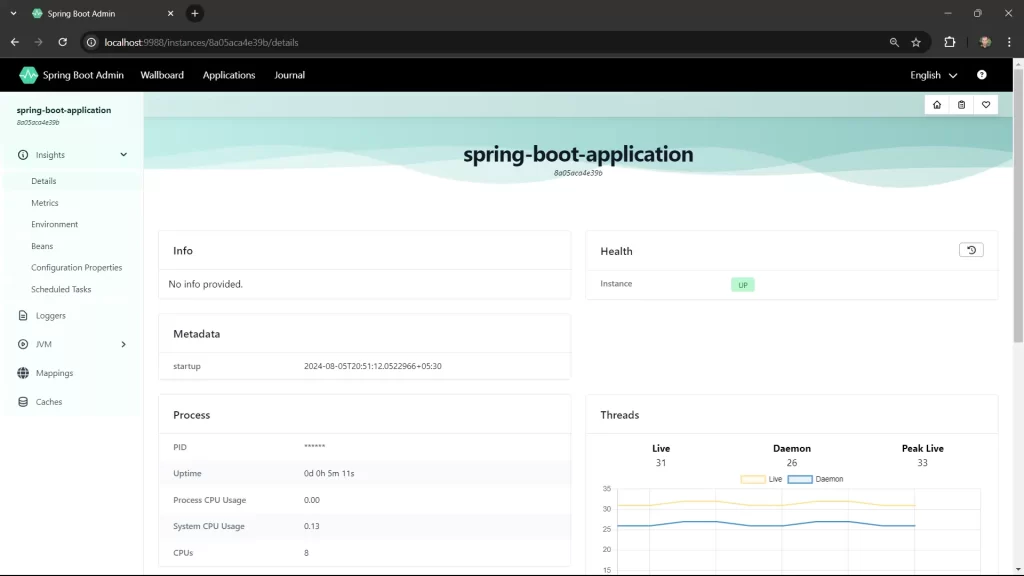
Admin Server: It provides one common UI for All microservices Actuator outputs. Now we don’t need to check every microservices URL manually.
Admin Server Project
- Create a Spring starter project
SpringBoot2AdminServer, and add the dependency:- Codecentric’s Spring Boot Admin Server (spring-boot-admin-starter-server)
<dependency>
    <groupId>de.codecentric</groupId>
    <artifactId>spring-boot-admin-starter-server</artifactId>
</dependency>- In
application.properties:-
# any port number
server.port=9988- At starter class: @EnableAdminServer
- Run the application.
Microservice Project
- Create a Spring starter project
SpringBoot2EmployeProject, and add dependencies:- Spring Web, Spring Boot Actuator, Codecentric’s Spring Boot Admin Client (spring-boot-admin-starter-client).
<dependency>
    <groupId>de.codecentric</groupId>
    <artifactId>spring-boot-admin-starter-client</artifactId>
</dependency>- In
application.properties:-
# Provider AdminClient --Admin server URL
spring.boot.admin.client.url=http://localhost:9988

#management.endpoints.web.base-path=/
#management.endpoints.web.base-path=/mytest
#management.endpoints.web.exposure.exclude=health,info,beans,env
#management.endpoint.health.show-details=always
#management.endpoint.health.show-details=when-authorized
#management.endpoint.health.enabled=false
#management.endpoint.info.enabled=false
info.app.title=ABCD-APP
info.app.version=3.2 GA
info.client.name=KnowProgram
info.client.license=KnowProgram-NEW
management.endpoints.web.exposure.include=*- RestController:-
package com.knowprogram.demo.controller;

import org.springframework.beans.factory.annotation.Autowired;
import org.springframework.http.ResponseEntity;
import org.springframework.web.bind.annotation.GetMapping;
import org.springframework.web.bind.annotation.RequestMapping;
import org.springframework.web.bind.annotation.RestController;
import org.springframework.web.client.RestTemplate;

@RestController
@RequestMapping("/employee")
public class EmployeeRestController {

    @Autowired
    private RestTemplate rt;

    @GetMapping("/show")
    public ResponseEntity<String> showMsg() {
        return ResponseEntity.ok("Hello");
    }
}- AppConfig:-
package com.knowprogram.demo.config;

import org.springframework.context.annotation.Bean;
import org.springframework.context.annotation.Configuration;
import org.springframework.web.client.RestTemplate;

@Configuration
public class AppConfig {
    @Bean
    RestTemplate rtemplate() {
        return new RestTemplate();
    }
}
Run Apps
- Admin Server
- Microservice app
- Enter URL:- http://localhost:9988/applications
- Click on the Application name

- Click on the ID shown
- Check all services

If you enjoyed this post, share it with your friends. Do you want to share more information about the topic discussed above or do you find anything incorrect? Let us know in the comments. Thank you!